There exist about of site’s sites and tons of software’s which enable and perform the task of porting Windows 7 into a flash drive and make it bootable so that one could install the operating system directly from the flash drive. The advantage of doing so you might ask? Well installing from a flash drive reduces the time taken to do so by about 30 – 40% with respect to installation from a disc. What many people do not know, is that you really do not need to buy or download any kind of third party apps to carry out the procedure of making a bootable windows 7 flash drive. This tutorial provides you 9 simple steps by which you will be able to carry out the task yourself in a matter of minutes.
First off you will need the following things before proceeding anywhere.
1. A USB flash drive of minimum 4GB capacity.
2. Windows 7 installation files.
Okay, now that you have acquired the above, the first step is to plug-in the flash drive into the computer at a safe USB port so that there are no interruptions in the process. Next, open up the command prompt on the computer with administrator rights. The way to do is to simply type ‘cmd’ in the start menu search box and hit Ctrl + Shift + Enter, else go to start menu> programs > accessories and then right click on the command prompt and select run as administrator.
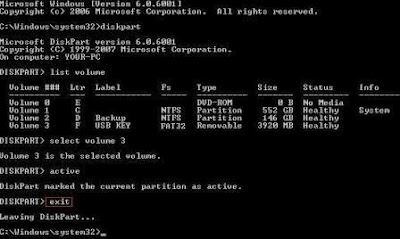
This opens up the command prompt on which you will be entering various commands so that the flash drive is configured to be bootable. Next type in DISKPART and hit enter and you will see the following message
Now that you have entered disk part, enter the command LIST DISK and keep a note of the disk number (like Disk 1) of the USB drive that you have inserted.
Next, type in the commands in the commands one by one correctly without going wrong. We are assuming here that the USB drive that you have inserted is detected as “Volume 3”. But if your device is named otherwise (like DISK 2) then you will have to use Disk 2.
Now, execute the following commands one by one:
SELECT Volume 3
CLEAN
CREATE PARTITION PRIMARY
SELECT PARTITION 1
ACTIVE
FORMAT FS=NTFS
ASSIGN
EXIT
Once you have completed the execution of the above commands, do not close the command prompt yet. There are a few steps which still need to be done. So just simply minimize it and put in the Windows 7 DVD in the DVD drive of your computer. Let’s assume that your DVD drive is named “D” and USB flash drive goes by the name of “H”. You could open my computer to know about the drive names.
Next type in D: CD BOOT and execute it (hit enter). Here D is the drive letter.
The last command you need to execute is BOOTSECT.EXE /NT60 H: where ‘H’ in this command refers to the flash drives letter. This code updates the flash drive with BOOTMGR compatible code. Once you have done this, your flash drive is now bootable. All you have to do now is to copy all the contents of the Windows 7 DVD into the flash drive and boot the computer through it by changing the BIOS settings.

